Group vs Assembly in Revit
- Han

- Dec 28, 2021
- 5 min read
In Revit, there are two grouping methods which are Group and Assembly. Some understand that they are similar functions that are grouping the repetitive elements, but it is actually quite different. Although it is the same grouping method, it has a different behaviour, tools and workflow We are going to find out when/why/how to work on each method in this article.
[Group]
When should use Group?
Repetitive elements or layouts will be modified frequently through the design process. For instance, the interior layout, which is considered a typical type. Once one of the groups are modified, it will impact all the same groups in the project. Therefore, it is significant to understand that how to work with the group.
Repetitive elements or design
No needs to be tagged

Why should use Group?
Group is a favourite tool when you have a repetitive design in the project. It is easy to copy and paste throughout the project as well as management. However, there are some pros and cons to be considered. In some cases, the linked model is preferred depending on the situation, and it will be covered in another article later.
Pros
Save lots of time to model the same design/elements
Easy to manage/maintain the same design
Room can be included
Group can be duplicated
Can convert to the linked
Can be saved externally
Cons
Can be corrupted when copied across the levels (Issued could be related to levels)
Can be abused by the users (Group might be used although it is not needed)
There are so many Don’t
Abusing this tool will impact the model performance
How to use Group?

1. Select the element to group 2. Go to the Modify Tap and click Group

3. Name the Model Group to identify it. Please make sure the naming convention makes sense.

4. Once it is created, adjust the origin (Optional)
Best Practice to work with Group
Keep elements and their hosts in the same group together
All elements in the group are hosted to the same level
Some elements may not behave correctly. Line-based families for instance
Don’t constrain elements outside the group. There are many kinds of constraints
Don’t group large numbers of elements as it will hinder performance, and possibly cause corruption. It is better to have many small groups than a few large groups
Don’t nest Groups. In other words, don’t have groups inside groups
Don’t fix the group when the warning appears. It will not fix the issue, but explode the group or duplicate it as it is no longer the same as the group
Don’t make copies of groups called Group 1. Name groups correctly
Don’t mirror groups
If there is a slight difference?

Some users tend to hide the elements or use the filled region to correct unwanted graphics due to the slight difference in the context. However, it can be easily resolved. There is an option called 'Exclude' in Group. This will allow the group to be a bit flexible in relation to the adjacent context. If you want to maintain the same group, but it has a slight difference in the context, you can exclude the related elements without creating new or modifying them. The excluded elements can be included when required.
How to exclude the element in Group?

1. (Tap) Select the element outside of the group 2. Click the icon to exclude the element

3. When the element is excluded, the icon is changed to the icon with the diagonal cross
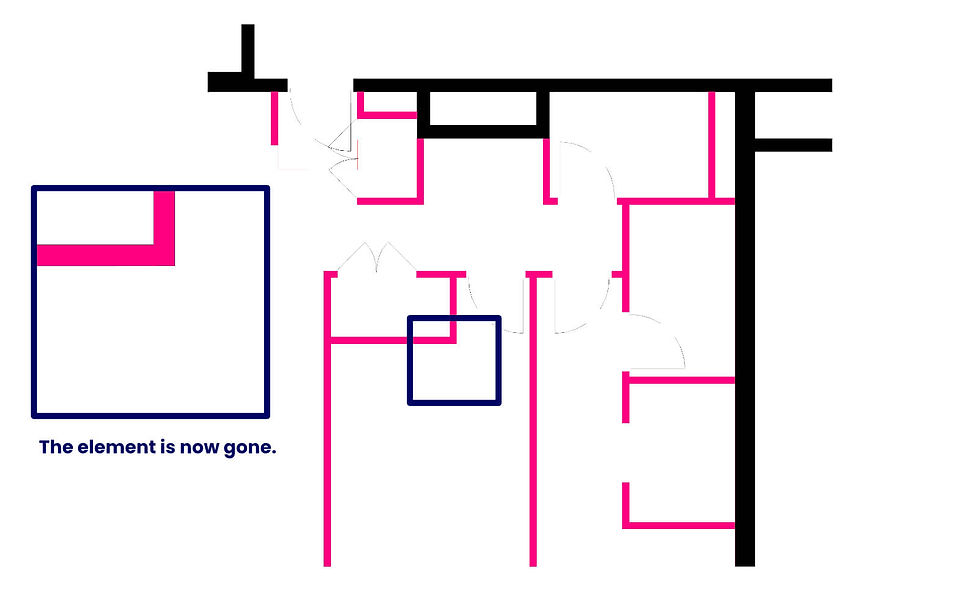
4. The excluded icon is not visible

5. When you select the group, the excluded element can be seen as highlighted
[Assembly]
When should use Assembly?

Assembly is normally used for the elements that require to be quantified and the documentation (detailed design or shop drawing). Joinery is the most common element that requires the Assembly tool as it needs to be quantified, tagged, documented.
Repetitive elements or design
Tag/documentation required as a set
Why should use Assembly?
Assembly is a powerful tool to produce the shop or detailed drawings. Especially, it is useful for structural documentation as there are limited tools for the structure to document them in Revit.
Pros
Easy to produce the detailed/shop drawings
Can be edited/tagged/scheduled
Revit automatically reads the assembly if the elements are the same value (?).
Cons
Impossible to modify the elements in Assembly. It will automatically create a new assembly if modified.
Time-consuming workflow
The views are located in different categories in the project browser.
Assembly must be a completed design. Otherwise, it will be time-consuming to amend it.
Abusing this tool will impact the model performance
How to create an Assembly

1. Select the elements that you want to assemble. It is good to minimise the number of objects in Assembly
2. Once selected, click Assembly in Modify Tap

3. New Assembly Dialogue will appear and name the assembly correctly. As all the elements are casework, the naming category is already assigned to Casework. If the elements are from different categories, you should be able to choose the naming category.

4. Once done, Assemblies will appear in the project browser. It is where your views will be stored. You can also re-name the assembly here.

5. When the assembly is selected, the Modify tool, which includes Edit Assembly, Disassembly, Create Views and Acquire Views) will be activated.
6. To create the views, click Create Views (you can do it in Project Browser as well)

7. In the Create Assembly Views Dialogue, you need to make sure that four options such as Scale, Views, associated View templates, and Title block for the sheet are correctly selected

8. Once all the options are selected, the views chosen including the sheet are generated in the project browser. I would recommend excluding the sheet from the assemblies tree as it is difficult to manage the drawings
Best Practice to work with Assembly
Appropriate Naming Convention
Appropriate Naming Category
Make sure the Origin location is correct
Don’t assemble large numbers of elements as it will hinder performance
Disassemble an assembly

Assembly can be disassembled. It is like ungroup in the group. However, it is more than that. Disassembly will ungroup the assembly and the elements in the assembly remain, but the related views will be deleted if the assembly is the last one or the original. Therefore, it is critical to review the assembly whether it is a prime assembly. If so, the other assembly should acquire the views.
Matching value requirements in Assembly
In order for Revit to recognise the existing assembly, there are three requirements shown below to be the same.
Element Type
The number of Elements
Elements Location
What elements CANNOT be included?
Annotations and detail items
Assemblies and elements that are already part of another assembly
Complex structures (Trusses, beam systems, curtain systems, curtain walls, stacked walls)
Elements in different design options
Groups
Imports
Links and elements in a link
Masses
Model lines
Railing that has a continuous top tail or handrail defined in the railing type properties
Rooms
Stairs
Structural loads, load cases, and internal loads
To sum up
